The Art of Mucking (Part 1)

If you’re new to caring for livestock you soon realize that you need a small arsenal of shovels, rakes and forks to pick through all the different medium your fuzzy friends poop in or on.   It seems rather odd for me to be writing a post about poop detail but the truth is it’s an art.  Yes I said art.  A seasoned ranch hand can wield a fork with the grace of swordsmen.   Professionals can toss just one horse apple from a fork at a time across a 12’ stall into a muck bucket or the whole pitch without missing their mark.  Yes, I call mucking an art.

I still haven’t found the perfect alpaca fork yet but here is what I have in my barn and their use.
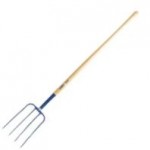

pitchfork
Pitch Fork:
Pitch forks are a time tested piece of equipment and every farm should have one.  They have wood handles and strong metal tines.  I personally like 4 or 5 tines to my forks so less stuff falls through them.  Pitch forks are used for heavy wet hay/straw that needs to be removed.  These are great for anyone who uses straw for bedding.  Personally I can’t stand straw bedding and the work it takes to keep a straw stall so my pitch forks are used to remove hay waste or when I need to pick into mud. Plastic and shoves do not do mud well.
 

stallfork
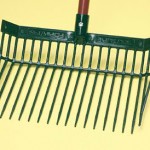
Classic Stall Fork:
Typical stall forks are usually wood handled with molded plastic ends with 17-18 tines and come in many colors.  These are my most favorite forks and my first choice for most applications.  The fork is light weight, sturdy, holds on to waste easily while allowing you to sift out the bedding or dirt from the fork.  This fork is the best for horses in sawdust or pine shaving bedding.  Alpaca beans are too small and fall right through the fork unfortunately.  I do use the fork to pick up pee areas for the alpacas since the sawdust clumps together nicely.  This stall fork is also great to use as a rake when adding new bedding to a stall.  Using a traditional rake is slow because it’s not strong enough to handle moving high volume sawdust.
finetines2
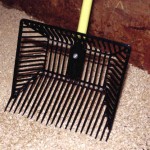
Fine-Tines Stall Fork:
Much like the traditional stall fork the Fine-Tines fork advertises 30 tines instead of 17-18 allowing smaller waste to be kept into the fork while still sifting the clean bedding out.  It’s an expensive fork $30! I contacted the company and inquired about its use on alpaca beans.  They said they had alpaca owners buy them but have never received feedback on their effectiveness.  Well here’s my review…. Don’t buy this fork!   Sorry Fine-Tines folks but the fork is very heavy, I hate the big basket on the end, it only traps 30% of the alpaca beans in the fork and its weird shape and bulkiness doesn’t allow it to bulldoze through bedding as easily as the traditional stall fork.  I was very disappointed in my purchase
L
shovel
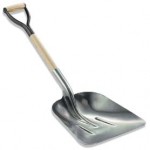
Shovel/Scoop:
Wide, flat bottom, coal shovel is my choice.  I use the shovel just as much as my stall fork.  It’s the only thing I’ve found to scoop up alpaca beans and great for stripping down stalls.  There are a ton of things the trusty shovel can do and it’s one thing that my hubby used to run off with but now he has his own.
 rake
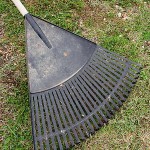
Yard Rake:
Your everyday yard rake be it plastic or metal, your choice. I prefer plastic; tines tend to keep their shape longer.  Alpaca beans are easily raked up into scoop-able piles, tidies loose hay/straw into piles and makes a great butt scratcher for your horse.  Yes, a butt scratcher; my horses just love to get a good butt itch in with the rake. 

I still haven’t found a fork that works to sift out alpaca beans from sawdust.  I’ll keep you updated once I find or make a fork for this application.

To make your chores quicker and easier on you and your bedding budget I highly recommend a 4-6” base of sand or stone dust covered by rubber stall mats.  Interlocking mats are best but if your base is thick enough, standard 4×6 mats from tractor supply work great too.  If you don’t get your base thick enough and it heaves with the freeze/thaw cycle then non interlocking mats can buckle.    Your trusty shovel easily will glide over mats without catching on anything or digging up your valuable base material. 

Happy Mucking!
Wood Pellet Bedding

When I brought home my horses, I quickly learned that finding the right bedding made all the difference in how long it took to do chores.

I started out with dirt floors alone. Yeah that turned into mud instantly. Next I dug out the dirt floors, filled in with 4-6” of stone dust and then added rubber mats on top for a nice level floor. Awesome! Rubber mats when installed properly so they don’t buckle are the best. At first I opted to use no bedding, shoveling up whatever the horse left behind. This was great until I got a pee-er who would flood me out.
Right off the bat I eliminated straw from my bedding list. I always hated mucking out straw stalls when I worked on other farms. Bulky, heavy, stinky, and one scoop would fill my muck bucket or wheelbarrow. Straw is out!

 The next course of action was shavings. They came in easy to stack bags, smelled great, and made the stall look so pretty when it was new and fresh. Clean up was easy, just scoop and toss. I did notice a few things I didn’t like; I was throwing away a lot of “good” bedding that was mixed in with the bad and pee areas were still puddles for quite a while before the shavings could suck it up. I did like the fluffy nature of shavings though, when laid deep offered warmth in winter like straw.

 I don’t remember what I was watching one day but I came across pellet bedding. I think it was on Youtube to be honest. Since one of my stalls needed a total strip down anyway I opted to give the bedding a try. I bought (4) 40lbs bags for my 11×11 stall, cut open the tops and filled each bag with 2.5 gallons of water and let them sit. WOAH, the bags swelled right up and over flowed with sawdust. I dumped the bags and used my trusty fork to spread the bedding around evenly. I was surprised on how much bedding there was, it filled up the whole stall 2-4” deep which is way more than I’d usually put in a stall.

 The first time I picked out the stall after using this bedding was amazing. The sawdust just fell right through the fork leaving me with only “apples” to toss. Pee areas clumped together so picking up only the wet stuff was easy leaving the dry to mix in. I wasted hardly any bedding.

 I’m in my 2nd year of using pellet bedding and have found for me the best use is 1-2 bags per stall initially adding 1(dry) bag a week and concentrate the bedding to pee areas.

I have also started using this bedding in my alpaca stalls. I found it best to lay a deep bedding here since they all pee/poo in the same spot. That way I can just scoop in one shovel full and back fill the spot easily.

 I did initially freak out using this bedding with my alpacas. They loved it so much and all of them rolled in it covering them in the fine sawdust. My mind went straight to shearing season and how much work I just created for myself having to figure out how to get that fine dust out of their fleece. It turns out the sawdust is nothing like shavings in alpaca fleece. Dry sawdust rests on top of the fleece and when they shake it all falls off. I skirted 8 fleeces and didn’t have a sawdust problem in any of them.

 My only complaint about sawdust bedding is the dust. If disturbed by wind the bedding creates a fine dust in the air. I can’t imagine it’s good to breathe in but using a hose on “mist” wets down the bedding keeping it from floating away. Unfortunately, winter = no misting = dry bedding.

 I’m now searching for a stall fork that will sift out the sawdust but let me pick the alpaca beans. I haven’t found one yet. I’ll keep you updated.

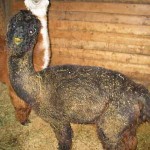
Alpaca Covered in Sawdust

Creamy Pumpkin Soup


pumpkin

1/4 c. butter
1 lg. onion, peeled and chopped
1/2 tsp. curry powder
1 (16 oz.) can pumpkin
1/4 tsp. salt (Sea salt is best)
2 c. Half and Half
2 1/2 c. chicken stock
1tsp. cinnamon
1/8tsp. nutmeg
Sour Cream or Shredded Romano Cheese

Melt butter in a large saucepan.  Cut up onion and saute in butter until soft.  Add curry powder, cinnamon and nutmeg and cook 1-2 minutes more.  Place mixture into food processer with pumpkin and salt.  Process until smooth.  Add Half/Half and process until smooth.  Pour mixture back into saucepan.  Add chicken stock and heat over low heat, stir occasionally. 

Serve soup hot with your choice of a dollop of sour cream or shreeded Romano Cheese in the center.   Great with a toasted bred.  Serves 6

How To Own Alpacas Without A Farm


Most of us have seen the Mike Rowe Dirty Jobs video of alpaca ranching.  There’s shearing, poop clean up, spitting, breeding, birthing, teeth filing, injections, toenail clipping and general farm care.   To say the least investing in alpacas is a messy business …. Or is it?

Did you know you can invest in alpacas without ever having to wear muck boots or pick up a shovel?  Or put off that large initial investment in a farm while realizing your dream of alpaca ownership?  Agisting or Boarding Alpacas at Dutch Hollow Acres allows you realize most of the benefits of alpaca ownership without the cost of establishing a farm or consuming your time to run it.  There are 2 types of agisting investors; Active and Passive.

Active:
These investors want to be part of their alpacas life and their care.  Most of these folks plan on having a farm in the future but do not currently own one or live close enough to the agisting farm where they can be part of the alpaca lifestyle.   Active investors take part in important decisions of their investment from showing, breeding, marketing, selling under their own business/farm name.   Active agisting allows the investor to be seen as an active breeder by the IRS and entitles them to all related tax deductions.  These deductions (including the purchase of initial livestock) can be healthy sized offsets to other forms of income.

Passive:
The passive investor is the type of person who sees alpacas solely as an investment animal and do not plan on taking part in any of the day to day care or decisions.   The aigsting farm makes all or most of the investment decisions such as breeding and marking of the animals.  The IRS allows this type of investor to only take deductions against any income earned from your alpaca investment.

What do boarding fees cover?
Dutch Hollow Acres board covers all of the general care and maintenance of the alpaca which includes: Grain, hay, water, de-worming, and toenail clipping.  Additional services such as sheering, teeth filing, breeding, birthing, marketing, brokering, etc are covered by the owner.

2009 Tax Deductions:
The IRS still has a great option under section 179 to deduct up to $133,000 of your initial alpaca purchase on your 2009 return.   Assuming a $25,000 initial investment, return on investment could be…. $3,750 for 15% tax bracket,  $6,250 for 25% tax bracket,  $8,250 for 33% tax bracket, or $11,250 for 45% tax bracket.   If you make your alpaca purchase late 2009 and file your tax return early 2010 you could see a sizeable tax return right away!  The IRS will let you fully deduct the purchase price of your alpacas even if you only put 25% down and are financing the rest.

Active investors can take even more deductions such as mileage in their return.  See your tax accountant for details.  It’s advisable to get an accountant who has experience with alpacas.

Initial investment:
Most alpaca investors plan on running their own farm some day and have been holding off on the idea of investing in alpacas until they can care for them.  In actuality it’s cheaper to agist your initial investment and take advantage of Section 179 tax deductions now than waiting another 5 years.  The typical alpaca investment includes 2 females.  1 Bred female and 1 juvenile female to keep investment costs more tangible.   Assuming a 50/50 male to female ratio and 80% live birth your initial 2 female purchase can grow to a herd of 12 in 5 years (7girls, 5 boys).   Assuming you don’t sell anyone off the herd could grow to 50 in 10 years!

General 1st Year Cost Analysis:


Farm Ownership

Agisting

2 Females

$25,000

$25,000

Farm Startup, Barns, fences, etc

$100,000

0

Equipment – tractors, implements, etc.

$30,000

0

Hay, Grain, Water

$300

0

Vet & Misc.

$1,200

$1,200

Insurance (theft, accidental death, major health)

$813

$813

Board

0

$1,825

Total

$157,313

$28,838


By boarding your initial herd, you can save the money you would have invested in farm start up costs and reinvest in more females or higher quality studs and grow your herd faster.  After 5 years the sale of your alpacas can be used to purchase your new farm!  The purchase of that farm can also be used to offset the income made on the sale of those same alpacas.

Guaranteed Return on Investment:
There are many variables that come into play with alpaca ownership that can affect profitability and as with any investment there is no guarantee on return.  Often the amount of effort you put into your investment is related to the amount of profit realized from it.  As a general rule bred female offspring will sell for as much as you paid for the dam.   Our other income sources come from the sale of fiber quality/pet males, stud fees, boarding, marketing/brokering fees, and sale of raw fiber or finished alpaca products in our farm store.

The majority of alpaca investors raise and breed alpaca’s full time within 3-5 years.  Currently my husband and I choose to still hold our “day jobs” as well as manage our farm.  We find that the care of alpacas is much less than other types of livestock and allows us to comfortably do both.

To learn more feel free to ask us any questions or schedule a farm visit.
Dutch Hollow Acres
Lindsay@lklik.com

585-991-6706

Self Feeding Bottle Baby

We were thrilled with our first cria and with it came instant challenge. It was the dam’s first cria and she didn’t have any milk and when we got that going she wouldn’t let baby nurse. (Trust me, we tried everything) Of course that means we now have a bottle baby on our hands.

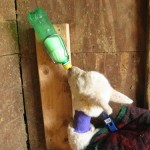
Thankfully Albina would actually drink from a bottle and not only that it turns out very little intervention from us was needed to get her going. We noticed she liked to drink her milk in the corner of the stall and when she got hungry would always go to the same corner. This got me thinking that I could fashion some sort of bottle holder so I could just put the bottle in there and let her go at it.

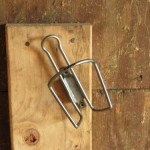
If you haven’t figured me out yet I’m one for recycling “junk” found in the barn. I found my old bike and eyed up the water bottle holder. I bet it would hold a baby bottle upside down no problem. So I confiscated it. I put it next to the wall and noticed it didn’t give enough clearance between the bottle and the wall so I dug around the barn again. Ah ha! A section of 2×6. Perfect. Nailed the 2×6 to the wall and screwed the bottle holder to the 2×6 at an angle. The bottle holder bends easily and I could work it so that it would best hold the bottle of milk.

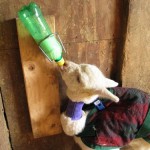
The end result was perfect. I tested it out and Albina immediately took to it. She seemed to enjoy drinking this way and now runs to the corner and nudges the bottle holder when she’s hungry and wants me to come out with more food.  I love it for night feedings.  I use a smaller 8oz human glass bottle.  After warming the milk I stumble out, put the bottle in the holder and stumble back to bed.

A few notes:

  • Milk needs to be kept below 45 deg F to prevent spoiling
  • Warm milk will spoil within 15-30 min
  • Newborn cria need milk to be warmed close to 100 so they are not spending calories to warm milk and to prevent a drop in body temperature.
  • When cria are gaining weight regularly, weather is cooperative, and body temp flux is no longer a worry cold milk could be used so bottles can be kept out longer without supervision.
  • I have read and heard a lot of conflicting information about warm milk vs cold.   Consult your vet and do research before offering cold milk to any cria. 
  • Cold Milk Cons:  body temp loss and promotes diarrhea.
  • Cold Milk Pro:  Ability to offer free choice of milk (if kept cold with an ice pack) prevents cria from over eating in one sitting which tends to lower problems with digestion and lower the chances of them getting diarrhea.

Why bottle feed this way?  If you have a male cria, bottle feeding with little to no human intervention could help prevent berserk syndrome.