Alpaca Business – Writing an Alpaca Business Plan

Most alpaca ranchers are not going to go to a bank and attempt to take out a loan to fund their initial alpaca herds.  So the type of alpaca business plan you’ll probably need is not as in depth as what a bank is looking for.  What I use my business plan for is to keep my spending, marketing, breeding, and sales on tract and I use 1 year, 2 year and 5 year goals in my plan. 

The biggest reason you should have an active business plan is in the off chance you are audited by the IRS.  Many alpaca ranchers run the fine line between running a farm for profit (business) and running a farm at a loss (hobby).  Don’t get me wrong, there is technically nothing wrong with running your farm at a loss and most of you will probably be in the red for 3-5 years after your starting your farm until your herd builds up and you are able to make your first sales. The trick is if the IRS audits you to make sure you are seriously running your farm and attempting to make a profit.  Having a business plan is step one in proving you are running a farm as a business.

Writing a business plan is going to take some time and some homework on your end.  However don’t let it scare you.  In the end you’re technically just interviewing yourself. 

Business Plan Outline – for self use not for banks

  • Purpose
    • Brief description of objectives
  • Description
    • Business Form: DBA, Partnership, LLC, Corporation etc
    • Type of Business: Retail, wholesale, manufacturing, service, etc
    • What is your product/service
    • When does your business open/start?
    • What have you learned from other businesses of similar type?
    • Why will your business be profitable?
    • What are your personal and business goals?
  • Product/Service
    • What are you selling? Seed stock, raw fiber, processed fiber, end products, boarding, shearing, training?
    • What benefits are you selling with your product/service
    • What makes your alpacas, products/services different from other farms?
  • Market
    • Who is your customer? Who will buy from you?
    • Is the alpaca market growing, steady or declining?
    • Is your share growing, steady or declining
    • Are you segmenting your markets? How?
    • Are the markets large enough for you to expand?
  • Competition
    • Write down your closest competitors (alpaca, sheep, goat, fiber farms)
    • Who are your indirect competitors  (Walmart, Joann Fabrics, Local yarn stores)
    • What have you learned about your competition’s advertisements?
  • Product Development
    • What products/services are you considering?
      • Huacaya, Suri, Both
      • Produce high quality seed stock or mid range?
      • Boarding, shearing, sorting, training services?
      • What are you going to do with the fiber?
        • Process yourself, mill, co-op, donate
      • Are you going to sell end products?
        • Made by you? Made in USA? Made in Peru?
      • Where are you selling finished products
        • Online, farm store, farm market, craft fairs
  • Marketing
    • How will you attract buyers?
      • If selling alpacas how will you get your name out to others?
        • Show alpacas, AlpacaNation, OpenHerd, AlpacaStreet, Other?
    • Print advertising? Online? eBay? Etsy? Road Sign?
    • What markets do you plan on entering?
    • How do you price your products/services?
      • Location Location Location!
      • Is your farm easy to get to?
      • How far do people have to travel to visit your farm store?
    • What kind of space do you need?
      • Barns, Pastures, Hay storage, Farm Store
      • How is your land zoned?
      • Do you have parking and wide enough driveway to accommodate traffic for a farm store or for trucks with gooseneck trailers for alpaca transport?
    • Other demographic/market shifts in your area
  • Sales Plan
    • Weekly, Monthly, Quarterly Sales goals
    • What other checkpoints do you have
      • # of cria born per year
      • If you own a stud # of outside breedings sold
      • How many alpacas do you want to board
      • How many head do you want to shear/sort
  • Personnel/Operations/Management
    • I combine these because chances are you are your only employee
    • What is your background/experience? What skills do you have?
    • What are your strengths and weaknesses?
    • What are your plans for training and education?
    • Clearly define your duties
    • What additional resources do you have? (Day job?)

I’ve tried to incorporate many of the alpaca specific questions you would need to ask yourself when writing up your business plan.  Do not expect to answer all of these questions immediately!  I will be going in to many of the headlines over the next few weeks to give you a better idea of how you go about collecting and computing the information needed in your plan. 

Click Here for the Overview and links to other articles

For more personalized help with your business plan stop by your local chamber of commerce, the business department at your local college or university or http://www.sba.gov

Preparing for Alpaca Shearing Season

Welcome Fiber Arts Friday Folks! 
This weeks article has been brought to you by guest writers Chris and Jody Hatch of Salmon River Alpacas

  • LOCATION OF SHEARING
    • Clean, dry and out of the wind, rain, and sun    Garages or work areas in the barn work great for shearing. Shearing in the hot sun or in a manure pile inside or out just makes for a miserable day, for alpacas and helpers. 
    • Good lighting-Dark animals are very hard to shear in poor light.
    • Power- A functional power source within 100 feet is appropriate. Most shearers carry long extension cords for this purpose.
    • Proximity to the animals    An efficient/convenient way to keep things going is to have the animals in pens near the shearing site. It is important to have the next animal ready as soon as possible.  Getting the next animal sometimes can take longer than the shearing.  Truly a waste of time and very frustrating.
  • ALPACAS
    • Keep them dry!!!    This is the most important thing you can do.  Keep them inside….even heavy dew makes a difference.  Shearing a soaking wet alpaca just doesn’t work.  An animal that is wet because they stood in a bucket is different.  Cancellation is certain and rescheduling is difficult.
    • Getting the next animal    Have a system to bring animals quickly to the shearing station.
    • Fleece    Do not worry about debris in the fleece.  Rolling in hay before the shearer arrives is not a catastrophe.  Please don’t vacuum them before they are shorn….it freaks them out!  Clean your fleece later using your skirting table.
  • PEOPLE
    • Provide assistants    For maximum efficiency it is important to provide at least 3 people to assist the shearer.  The shearer shears, one assistant controls the alpacas head, the others can collect fleece and/or prepare the next alpaca to come to the shearing site.  Have a plan for who is responsible for each ‘job’ and stick to it.  The more animals that you have the more people you should have.
  • SUPPLIES
    • Shearer’s bring everything they need to shear your animals.  Some shear on the ground, with a shearing table or standing.
    • Bags- Clear plastic garbage bags work the best.  It is the responsibility of the farm to provide the bags.  You should have 3 bags per animal, prime or blanket fleece, second and thirds. 

Since 2003 Chris and Jody Hatch have owned and operated Salmon River Alpacas in Pulaski NY.  Their farm offers alpaca sales, breeding, boarding, brokering services, shearing service, a farm store, and lots of hands on enjoyment.  Visit the farm website a www.SalmonRiverAlpacas.com

See Photos from our 2009 shearing with Chris and Jody!

Short video of Chris in action.

Human vs. Alpaca Round 1


This past Sunday evening we decided to give the alpacas their monthly Ivermec shot and to trim toenails. Monthly shots are hardly exciting anymore and usually none of the alpacas put up much of a fight. Clipping toenails turned out to be a totally different story.

It turns out alpacas are fully aware of the 80/20 rule. 80% of your problems will come from 20% of your alpacas. I seriously think alpacas can count and do math. 1 out of 5 girls is 20% after all.

We saved the hard ones for last with the false hope that maybe they’ll watch the others and get the idea that no one was being killed. The others did such a good job and stood quietly as I picked up each foot and clipped the long nails off, I was really feeling hopeful. That was until we went to catch the last one.

Giving the shot wasn’t a problem at all and went smoothly. I slowly worked my hand down from the neck to her legs and the first explosion went off. Did you know that alpacas when standing on their hind legs are WAY taller than my 6’2” frame? Thankfully M was with me and the 2 of us got her under control, or so we thought. First it always starts with the spitting but in our case it was more like dodging grape shot. M had been keeping her occupied by feeding her hay stretcher and each time she spat the chunks of stretcher would fly out of her mouth like bird shot. Potentially hazardous, but thankfully no match for Carharts.

M finally got her in a good hold and I managed to clip the first foot and she then went into full wrestling mode with M. After a short tiff, the position I found both alpaca and husband was quite peculiar. M was straddling her, heck stuck out between his legs like a large knight mounted on a really small and fuzzy horse. M seemed as confused as the alpaca on how they ended up that way but she seemed to be comfortable and was still standing. So, I took quick advantage of the situation and managed to trim the other 3 legs.

Mission accomplished M dismounted his trusty steed. His mount seemed to have forgotten the whole event and immediately went back to sniffing out our hands and pockets for treats.
I’m not quite sure how to award this round so I’m going to consider it a tie.

Coyote Alarm Call

Finally the weekend! I was so excited about being able to sleep in to 7am on Saturday morning. The week was busy with long days and short nights and all I wanted was to catch up on some sleep.

All that hope turned to panic with M. jabbing me in the side at 5:15am Saturday morning. “Do you hear that?” he said. The sound was unmistakable, coyotes. Usually we hear them far off in the distance but they sounded like they were right out our window.

I couldn’t get the lights, clothes, shoes on fast enough. My blood was boiling. If they sounded that close I just came to the immediate concussion that they had gotten into the alpaca paddock.

Armed with nothing but flashlights we bolted out the front door which thankfully was enough to scare off the coyotes. To my relief all alpacas and horses were accounted for and unharmed. Needless to say with that much adrenaline running through my system there was no going back to bed. *sigh*

Instead I decided that putting a full effort into researching livestock guard dogs(LGD) was a better use of my time. Looks like I have a lot of reading and talking to breeders to do before I settle on which one would be right for our farm. I’ll keep you updated in future posts of our LGD research, purchase and integration.

How To Make A Rag Rug (Toothbrush Rug)

Welcome Fiber Arts Friday Fans with WonderyWhyGal

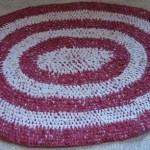
Rag rugs are a blast to make and do not require any fancy techniques like crocheting.  The rugs are fairly quick to make and you can see the results of your efforts take shape in just a few rows.  This technique is not limited to rugs, you can also make other items like a rag placemat, dog bed, cat bed, bedspread, basket, or anything else you can think of.  These rugs can be great kids projects too since it involves fun things like ripping of fabric.

Making a Rug Tool:
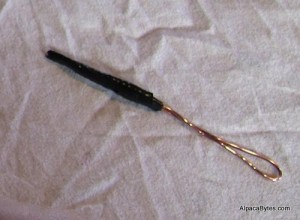
Rag rugs are often called Toothbrush rugs because of the type of tool used to make them.  Folks used to cut the head off an old toothbrush and file it down to a point while using the pre-drilled hole (for hanging your tooth brush) as a place to attach the fabric to.  Today, there are fancy prefabricated tools you can use or you can still make your own.  Technically a rug tool is just a really big needle.

I’m cheap so I chose to make my rug tool out of scraps I found in the basement.  My needle is made out of scrap copper wire and electrical tape.  It might not be pretty but who cares, it’s free.

Making Fabric Strips:
For my rug project I decided to repurpose some old flannel sheets.  I cut a little slits along one edge of the sheet every ½ inch or so.  Now comes the fun part!  Grab that little fabric tag and rip!  The flannel sheets tore very evenly right down to the end without the need to cut each strip out by hand.  If you have a cat hanging around this process is very fascinating and you might have to fight for some of your strips back.

How To Connect Fabric Strips:
Now that you have all of these strips hanging around you need to be able to put them together.  Many suggestions have you sewing the strips together, which is great, if you have that kind of time to waste.  Easiest method I found is to cut a small slit in the ends of each strip and slipknot them together.  Thread one strip through the slit you made in the other and then feed the tail of the 1st strip through the slit you made in the end.  Pull tight and voila you have connected the 2 strips together.


Starting Your 1st Row:
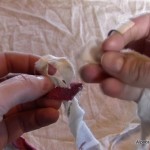
These directions are for a rectangular rug.  I will cover oval rugs and circle rugs on another post. Start your rug at the connecting slipknot where your 2 fabric strips meet.  1 of these strips will be the “core” the other will be used to tie the knots.  I’m right handed so find it easier to hold my strips in my left hand and use my rug tool in my right.  In the photos the light colored fabric is the “core” and the red is what I’ll be tying knots with.

–       First cross the red over the white so it looks like the number “4”
–       Feed the tail of the red behind the white and through the loop hole  in the “4”
–       Pull the red all the way through and make your first knot. Keep this first row  fairly taught but not so tight that you won’t be able to get your tool through again later
–       Make sure your “core” fabric stays straight and doesn’t get curled up into your knots
–       Continue knotting until you achieve the width of the rug that you want
–       Row 1 can be a bit of a pain.  You may find it easier to use a safety pin to secure it to something.  I usually like to stand up and place the first knot on a hook and knot my first row from there.

Starting Row 2 – ?
Again, these directions are for a rectangular rug.  This is the easier of the rug patterns to make and does not require any extra stitches per row. The length of your first row is the width of your rug.  How many rows you add on from this point determines the length of your rug.

–       When you’re ready to start your next row, fold your “core” fabric over so it is now playing alongside your row of knots.
–       With your rug tool stab the center of the last knot you had just made
–       Make sure you still go behind the “core” fabric before you come through the loop

Changing colors:

Solid color rugs are no fun of course you want to change colors.  When you get to a point you want a new color just cut the fabric off, cut a new slit in the end that is part of your rug and tie in your new color.

 Video of all the steps described above!  In HD!