Waldo Watch Cap – Knitting Pattern

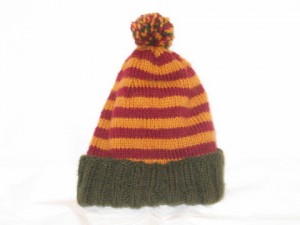
This was the first hat I ever knitted.  It is simple yet uses some new techniques to keep your brim even and stretchy and has fun colors for kids or kids at heart.

Waldo Watch Cap

Needle: #7 16” round
Yarn: Ella Rae Kamelsoft  (merino /camel blend) (88yrds per ball)
            (1)Dark Green
            (1)Dark Red
            (1)Mustard
Stitch Markers
Darning needle

Cast On Method: German Twist
            Small (60) Med (80) Lrg (100)   I used 80 for the hat shown, it fits most size heads

Brim: Mark beginning of round with a stitch marker
Work Knit 2 Purl 2 (K2P2) ribbing until 4 inches in length in Green

Hat: Starting with Mustard color knit 4 rounds switch to Red and knit 4 rounds.  Continue until when you try on the hat it is of a good length.  (TIP: see video for how to do joggles stripes)

When you are satisfied with the length it’s time to decrease rounds.

Place stitch Markers every 10 stitches. 

Knit the first 2 rounds of the color as normal
On the 3rd round of the color K2tog the last 2 stitches before your marker
Knit the 4th round as normal

Switch to new color and repeat above.
Continue decreasing until difficult to do so on circular needles.

Cut a long tail and use the tail to slip the stitches off your needles.  Draw the top together and secure the top and darn in your tail end.

Use a pompom maker with all 3 colors to make a nice ball for the top.

This hat is meant to have a triangle shaped top that stands up like Where’s Waldo’s hat does. Have fun and enjoy!
How To Braid A 6 Strand Rope With A Core

My last Friday Arts Friday post I had many comments on how to braid a lead rope.  So while I worked on my latest one I decided to take a video and so you can see the technique.

The best braids are made out of cord and for beginners the easiest cord to work with is nylon parachute cord.  For the project you are seeing in the video below I’m using 100% baby alpaca cord.  If you’re interested, I can make cord out of your own alpaca yarn, email me for pricing info.  To see or purchase the finished product in this tutorial click here.

When you are braiding round braids you’ll want a core to braid around to help keep the shape of the braid and give it some “meat” in your hands when holding on to it.  Otherwise you’re braiding a tube which will deflate when you hold onto it. It also prevents the finished project from stretching out and gives it strength.  Since the core is not visible it can be of any material you want, I opted to use some scrap acrylic.

Now you have to figure out the length and affix your core around the end snap.  My core is made from 16 feet of chunky acrylic yarn fed through the snap and then twisted into cord to a length of 6.5 feet.  I hate getting to the end of a braid just to find out I don’t have enough cord for the length I want so my rule of thumb to find the length of my strands is to double the length of my core.  So you’re thinking; ok 6 foot leash doubled = (6) 12 foot strands? WRONG!  We want a snap at the end of our leash which means we need (3) 24 foot strands folded in half with the snap in the center. 

I’ve never been able to learn how to braid by reading so instead of describing it, I’ll let the video do the visual babble for me.  If you have any questions feel free to ask away.

[flashvideo file=wp-content/uploads/Video/Braiding.flv /]